Structured Scenarios |
  
|
Structured Scenarios |
|
The EA Structured Scenarios feature is a huge time-saver when you need to create complex use cases. It's particularly useful when those use cases change, as EA allows for easy inserting and deleting of scenarios and steps, and even automatic generation of diagrams direct from the scenario text.
So it's natural that eaDocX allows you to print all the details of structured scenarios.
Printing all the details of a structured scenario is a bit complicated to setup, as it involves 3 kinds of EA element:
• The Use case, which must be configured to print INLINE, and to print it's scenarios (one of the standard attributes for Use Cases)
• The Scenario, which must also be configured to print INLINE (if you want all the scenario steps). It must also be configured to print its Scenario Steps. Other than that, there's not much to say about the Scenario.
• The Scenario Step, which can either be INLINE or TABLE formatted. This is where the main formatting takes place, and where most of your content will be printed.
As this all a bit complicated, there is a Built-in Profile called 'Structured Scenarios' which you can import into your document (see Sharing Document Profiles), which has a working profile with all these already defined.
If EA Structured Scenarios are printed in the same way as other EA elements, you'll tend to get a lot of headings and sub-headings. For example:
1.0 All My Use Cases 1.1 Use Case #1 This is the description of Use Case #1 1.1.1 Scenarios These are the scenarios for use case #1 1.1.1.1 Scenario: Basic Path 1.1.1.1.1 Scenario Steps Finally, the bit we want to see!
|
|||||||||||||||
This is rather a lot of headings, and, in most cases, the 'Scenarios' and 'Scenario Steps' headings aren't very useful.
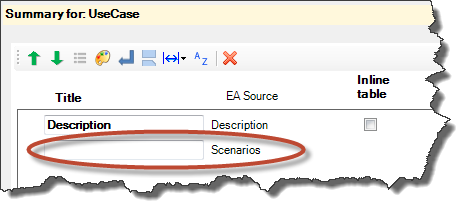
So, to miss-out these headings, just make their title blank:
In the Profile for UseCases:
For Scenario:
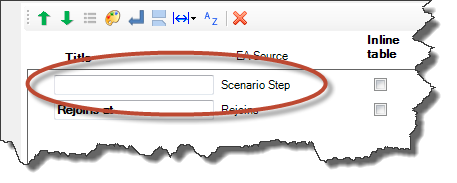
This will tell eaDocX to miss-out those headings altogether. This only works for Scenario and Scenario steps.
The result is a Structured Use Case which looks a bit tidier:
1.0 All My Use Cases 1.1 Use Case #1 This is the description of Use Case #1 1.1.1 Scenario: Basic Path Finally, the bit we want to see!
|
|||||||||||||||
If you use the built-in profile for Structured Scenarios, they you will get something like this:
1.1 Use Case: UC1
1.1.1 Basic Path
|
Notes:
1. The Links column is useful when you want to explicitly link a step in a structured scenario to another use case. Remember, this is a different to any use case to use case links you might have made in a use case diagram (which might also say that the use <<includes>> another
2. We've named our Alternates and Exceptions with the A1... E1... style, but that's just because it's what we're used to.
3. Note that eaDocX has put hyperlinks wherever there is an Alternate or Exception, which takes the reader direct to those scenarios.
Those hyperlinks point to where the Alternatives or Exceptions are printed e.g.:
1.1.2 Alternate: A2 - Another way of doing it Scenario Steps
Rejoins at: Basic Path Step: 1 |
The 'Basic Path' link points back to the correct step within the basic path.
Using these hyperlinks, it's possible to give the printed document the same structure as the use cases & scenarios, and allow the reader to follow the logic by clicking on the hyperlinks.
Some of the most common questions on the eaDocX forums are about printing of the diagrams which EA can generate from Structured Scenarios. Generating diagrams from the text is a huge time-saving, even if the diagram usually need to bit of editing in EA to make them look good.
The problem comes form the position in the element hierarchy where EA puts the diagram:
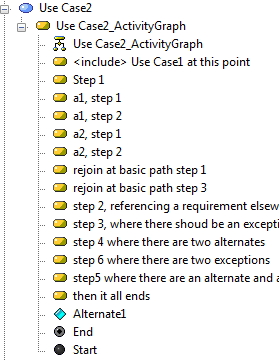
When EA generates the diagram it produces:
1. A single Activity under the Use Case called (usecase name)_ActivityGraph
2. A diagram below it and
3. An Activity for each Scenario Step in the use case.
This isn't very helpful for eaDocX users. To print the diagram, we'd have to
1. make Use Cases print their children, so that the UseCase2_ActivityGraph prints correctly
2. make Activities (like UseCase2_ActivityGraph) print their diagrams (but not children: those child activities are probably not useful if we've already printed the Scenario Steps.
This produces a document like:
1. Use Case 2 (...some scenarios, usually with tables for each scenario) 1.1 UseCase2_ActivityGraph (the diagram) |
The 1.1 heading won't mean anything to most users, and is useless anyway.
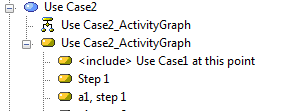
We've found the best policy is simply to move the ActivityGraph diagram to be a child of the Use Case, and get Use Cases to print their children, and ignore the Activities altogether.
So your EA model looks like:
and the document looks like:
1. Use Case 2 (...some scenarios, usually with tables for each scenario) (the diagram) |
The diagram can even be made to print before the scenarios, just by changing its position in the list of attributes for the Use Case.