Exclude EA content |
  
|
Exclude EA content |
|
The simplest way to create a document quickly is to link EA Packages with eaDocX sections. This pulls all the contents of the package into your document each time you re-generate it.
But what if there are things in the package which you don't want to include?
One way to get the right content into your document would be to change what the EA package contains to suit your document. This is fine when you only want to pull one document from your EA model, but what if you want to create many different documents, for example, for different audiences?
Also, structuring your model to suit a particular document may make it harder for readers to understand your model, and make it harder to maintain.
eaDocX has several ways in which you can exclude EA content from your document.
When you really get into EA, you'll find that there are some diagrams you need to create which just exist to create links between elements in your model. These can end up as large, rather messy diagrams. They're like the 'working out', rather than the public face of your model.
If you have diagrams like this, eaDocX lets you flag the diagram as one which should never be printed, in any eaDocX document.
To do this, we've hi-jacked a part of EA.
If you right-click on any EA diagram. then select the Properties | Diagram page:
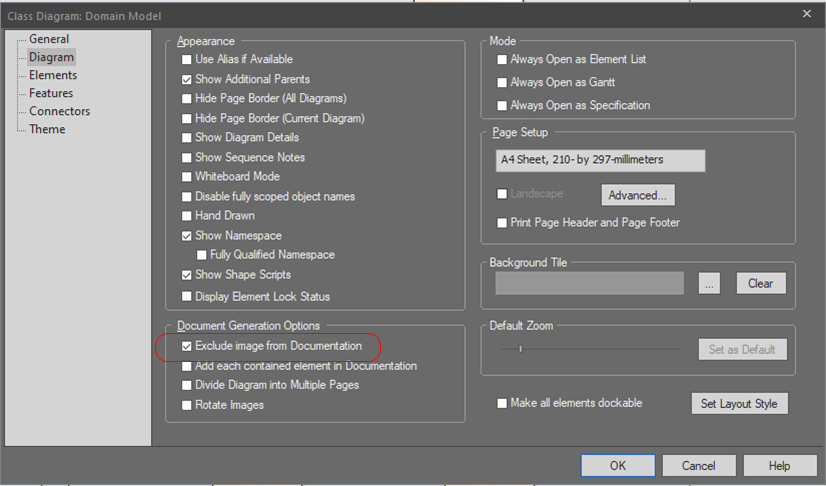
There's a check box - Exclude image from Documentation - which EA uses to exclude the diagram from it's own RTF generator. We've "borrowed" this setting for you to tell eaDocX much the same thing. It means "please don't print this diagram - ever".
If you select this box, then eaDocX will always exclude it.
Note: you may need to Refresh the eaDocX Preview page to show the exclusion has been set.
Tip: When you create non-printable diagrams like this, we've found it helpful to make it obvious to readers of your model that they are intended to be non-printable. We usually put "(Hidden)" at the end of the diagram name, so this diagram should be called "Readme (Hidden)" |
It may be that a Package, a diagram or even just a few elements shouldn't appear in your document. Rather than change the structure of the EA model, eaDocX allows you to exclude individual EA items:
For example, suppose we find this in our EA Project Browser:

There's a diagram at the top, which we've helpfully labeled as 'Hidden' so we'd expect that to be tagged as 'excluded from all documents' (see section above). Labeling diagrams as 'hidden' is a good habit to get into.
But there are a few other parts of the 'Top Level Analysis' package that we'd like not to appear in our document.
You can exclude:
- a package. This will exclude all the elements below it, including all other packages and their contents.
- a diagram - this means it won't appear in this document, but may appear in others.
- an element. This will also exclude any child elements or diagrams.
To exclude packages or elements, right click on the package or element icon in the preview pane and choose Exclude element, then either within this section or for whole document.
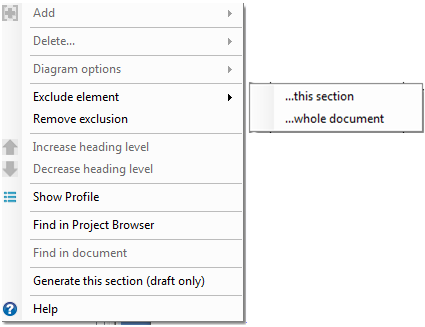
To exclude diagrams, right click on the diagram icon and choose diagram options>>exclude diagram.
After a bit of work, excluding various diagrams, packages and elements, the Preview Pane looks like this:

Although EA exclusions and "this document" exclusions are both shown with the same colored icon, the exclusion type is revealed when you hover the mouse over each red cross.
The above exclusions are fine for fine-tuning the contents of your document. But what if your document seems to include whole sets of EA elements which just aren't needed. For example, your model may contain EA 'Issue' elements, scattered all through the model, but you don't want them to appear in your document.
eaDocX lets you do this by just deleting the EA element type from the profile for your document. If eaDocX doesn't have any instructions (in the profile) of how to print a particular element, then it assumes you don't want elements of that type to be printed.
So, if 'Issue' elements are appearing, then we just need to delete the 'Issue Element' definition from the document profile.
In the example above, we added a few 'Issue' elements to illustrate the point. Our Project Browser now looks like this:

So we have issues all over the place. Going through the whole model and excluding each one individually would be possible, if a bit tedious. But whenever we added a new Issue, we'd have to remember to go back to the document and exclude it. Not very practical.
With no changes to the profile for this document, the Preview shows how the document would look.
Issue019 won't appear, but only because we already excluded its parent package:

Back in the Profile page, we can see that 'Issue' elements are configured to be printed Inline:

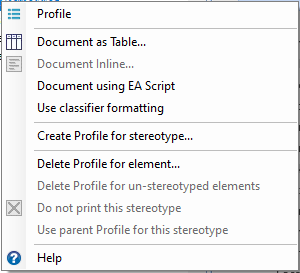
All we need to do is right-click on the 'Issue' icon, and select 'Delete Profile for element'.
This tells eaDocX that, for this document, whenever an 'Issue' element is found, just ignore it: if eaDocX doesn't know how to format something, it won't print it.
The options on this menu:
Option |
Explanation |
Delete Profile for Element |
No element of this type, regardless of whether it has a stereotype or not, will print. This is a good way of excluding a whole element type from your document |
Delete Profile for un-stereotyped elements |
Where you have defined formatting for some stereotypes of an element, this option removes all formatting from elements with no stereotype. This will mean that only elements with a stereotype will print: un-stereotyped ones will be excluded. |
Do not print this stereotype |
All elements with this stereotype will be excluded |
Use parent Profile for this stereotype |
Delete any formatting options for this stereotype. It will now print in the same way as the parent element. |
Now the Preview will show the issues as not printing:

The 'Issue' elements are still visible, but grayed-out, to indicate they won't be printed.
In this example, we removed the formatting for a whole type of element i.e. no Issues will print, regardless of their stereotype. Sometimes you need more fine-grained control over what is printed, so eaDocX allows you to creating formatting, and delete formatting, for stereotypes of elements, not just elements.
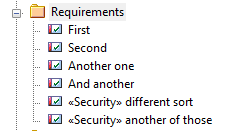
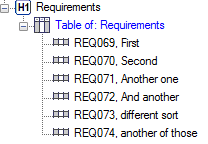
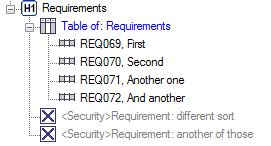
In this example, we have a package with two sorts of Requirement:
EA Package Browser: |
EaDocX Preview |
|
|
Suppose we don't want to print the <<Security>>Requirements. We could select the bottom two requirements individually in the Preview page, and exclude them. But if we have lots of <<Security>>Requirements throughout the model, we can decide not to print them at all.
In the Profile page, select the 'Requirements' element type, and choose Create Profile for Stereotype.
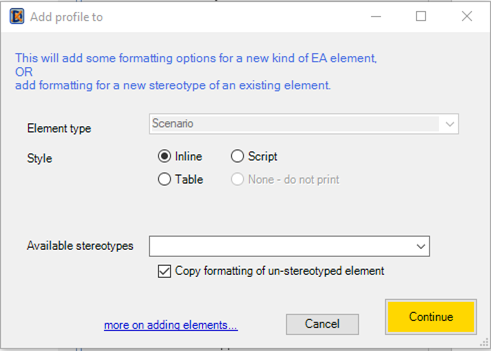
The Available Stereotypes drop-down shows the available stereotypes of 'Requirement' in your model, and selecting the stereotype <<Security>> allows you to specify 'None - do not print'.
The eaDocX Preview now looks like this:
This is quick way to exclude all elements of one stereotype.
![]()
![]()
![]()
![]()