Quick document settings |
  
|
Quick document settings |
|
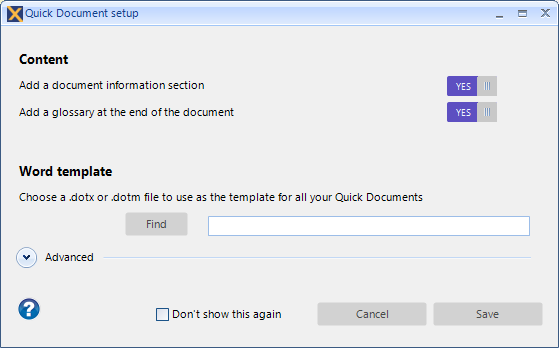
The first time you create a Quick Document, you will be shown some setup options.
These are also available in the application settings: EA / Specialize / eaDocX / Settings / Application Settings
Option |
Default |
Explanation |
See also |
Add a Document Information section |
ON |
Adds some information about the date and time the document was generated, and the repository from which it came. |
|
Add a glossary |
ON |
Adds a glossary of terms at the end of the document. |
|
Word template |
Normal.dotx* |
Allows you to choose a different Word template from the current default |
|
Advanced options |
|||
Print tagged values of all elements |
OFF |
In some modelling languages, like BPMN, there are many tagged values for each element. You can choose to print all these tagged values by switching this to ON. |
|
Print both forward AND reverse hyperlinks |
OFF |
By default, a Quick Document only prints hyperlinks from a source element to the target. You can also generate target to source hyperlinks, but be aware that this makes the document slower to generate, and is visually more complicated for the reader. |
|
Show 'document complete' message |
ON |
Switch to OFF to disable this message |
|
Use classifier profiles for all instances |
ON |
If your model contains lots of instances of elements, then eaDocX Quick Document can generate different Profiles for each element. The default is to create a single Profile for an element type, so all elements of that type, and all instances of all of those elements all print in the same way. |
|