Home / eaDocX Homepage / EaDocX Help / Auto templates / Creating Auto-templates
Creating Auto-templates
To see how you can use Auto-templates to make your documentation even easier, follow these steps, using data which is saved in the eaTeamWorks Example Model.
Finding the example data
- Find the eaTeamWorks Example Model, and the package eaDocX Examples / Using Auto-templates
- There are two projects here: Project 1 and Project 2.What you are going to do is create a great-looking document based on the content in Project 1, then use the same document for Project 2.
Creating the first document -the ‘Auto-template’ document – will take a bit of time, but you want to get it right. This document might get used by lots of different projects.
Creating the Template
(if you want to skip this bit, find the document Project auto template.docx in the eaDocX Example Document folder in the eaTeamWorks example model folder.
- Open a new eaDocX document, using your favorite Word template (EA Main menu / Specialize / eaDocX / new Word document / (choose your word template)
- You could just insert the whole of ‘Project 1’ into the document, but that’s unrealistic: most documents have more than one section.So we’ll add a separate section for each of the sub-package in Project 1.
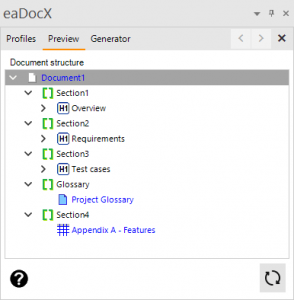
- Add sections for the ‘Overview’, Requirements and Test Cases packages. See Adding new sections.
- Document can have more that just simple package sections, so add a ‘Glossary’ section. See Document glossary. eaDocX will create a new glossary each time the document is re-generated, based on the contents of the document.
- Your document can also have sections which are cross-references, so that when you show the name of an element, you can make it into hyperlink. So insert a Cross Reference element report (see Adding Cross Reference reports) which lists all the ‘Feature’ element mentioned elsewhere in the document. This list will be dynamic, based on what appears in the document elsewhere, so will change each time it’s used.
So you should now have a document with 5 sections:

Now you can refine this document, so that everything looks exactly the way you want. This will probably mean editing the different Profiles for different types of elements, and maybe adding more or less data about each one. You might also add information about related elements.
When you are happy with the formatting, save it. You might like to give it a name which reminds you that you think this might be a useful template for other people to use, and maybe put it somewhere where your co-workers can find it.
Using the Auto-template on another project
Now you can try-out your new template on another project. This has been designed to be as easy as possible.
- Find the ‘Project 2’ package, and right click Specialize / eaDocX / Document using Auto Template
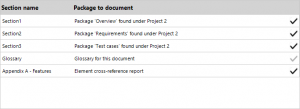
- eaDocX will now try to map the packages in ‘Project 2’ to sections in the auto-template, and will show you the results of the mapping.

- You can change which auto-template you want to use, and the output file name, and then just press ‘Generate’.
- That’s it. A new document, with new content, but with the same appearance as the original.
For more Auto-template options, see Advanced Auto Templates